All flowers eventually wilt, their flush of beauty only
temporary.
Removing the old dead flowers properly can force a new flush
of blossoms or encourage further healthy growth.
Cutting off the dead
blooms properly depends on the type of plant
and whether you want it to
grow seeds.
Improper removal can slow flowering or affect the health of
your flowering plants.
Basic Deadheading
Most annual and perennial flowers benefit from deadheading.
Plant varieties that flower repeatedly throughout the season may produce
more flowers
if you remove the old blossoms before seeds form,
and it
also improves the appearance of the bed.
Pinch off the old flowers above
the topmost set of leaves on each stem. If the plant grows multiple
flowers on a long stem, cut back the entire stem after most of the
flowers are done blooming. You can deadhead after each major flush of
blooms begins to fade, or you can pinch off the old blooms once or twice
weekly throughout the flowering period.
Woody Plant Deadheading
Flowering bushes and other woody plants, such as roses,
require sharp bypass shears for healthy deadheading.
For most woody
plants, cut the old flowers off within 1/4 inch of the closest leaf or
bud
to the old flower. When deadheading roses, make the cut within 1/4
inch of an outward facing bud near a three- or five-leaf grouping.
Deadheading woody plants is a form of pruning, so keep in mind the
desired shape of the plant when removing flowers and stems.
Deadheading Once-Bloomers
Once-blooming flowers, such as daffodils, tulips and peonies,
won't produce more flowers if you remove the dead flowers,
but they
will look better and remain healthier.
Cut or pinch off the old flowers
as soon as they wilt.
You can cut back the flower stems to the foliage
to improve the appearance of the plant,
but don't remove the leaves
until they die back naturally because
they provide greenery and collect
nutrients for the plant.
Setting Seed
Some annuals and short-lived perennials, including cosmos,
violas and petunias, readily reseed themselves, so you don't have to
replant them each year.
Other varieties, such as echinacea, produce
attractive seedheads
that also provide seed for birds in winter.
Leave
the dead flowers on these plant varieties if you want them to seed
themselves
or provide ornamental seed heads later in the year.
Cleanup
Dead flowers left in the garden can provide material for
disease organisms to grow on,
or they may allow pests to nest in the
garden and later attack your plants.
Dispose of removed flowers
immediately.
Adding the old blooms to a compost pile allows them to
break down
and later provide nutrients to the bed, or you can dispose of
the flowers in the garbage.
Roses (Rosa) provide a classic and elegant addition to your
landscape or garden,
with the added bonus of providing cut blooms for
vases.
Depending on the cultivar, roses grow in U.S. Department of
Agriculture hardiness zones 3 through 9. Applying the proper type and
amount of fertilizer to your rose bush can help create a lush and
healthy plant. Over-fertilizing roses causes more harm than
under-fertilizing and leads several problems.
Weaker Plant and Fewer Blooms
Over-fertilizing the roses leads to fast and sudden growth,
which produces an excessive amount of leaves and shoots that the plant
cannot handle.
This leads to a weaker plant and with fewer blooms.
This
overdose of nitrogen increases the foliage production at the expense of
flower buds
and, since roses are grown for their blooms, you are left
with a rose bush without roses.
Diseases and Pests
A weak plant cannot handle diseases and pests as well as a
healthy rose bush.
When the over-fertilized plant is attacked by bugs,
diseases or fungus that generally would cause little to no problems, its
weakened state decreases its ability to fight off these problems.
Furthermore, roses that have more nitrogen than needed
face an increased
chance of an aphid infestation.
Pollution
Applying too much fertilizer to the rose bush not only
affects the plant,
it also increases the chance of polluting waterways
and streams.
The excessive fertilizer runs off the soil or leaches out
of the ground and containment waterways, and possibly makes its way into
your local drinking water.
Burning and Leaf Dieback
Excessive fertilizer increases the amount of nutrients and
minerals -- such as salt and nitrogen -- in the soil. When the rose bush
absorbs these excessive nutrients and minerals, the tips of its leaves
begin to yellow or brown and lead to leaf tip dieback.
In addition, too
much nitrogen -- such as from over-fertilizing -- burns the rose’s
tender roots.
Mineral Toxicity
Over-fertilizing adds more minerals to the soil than needed,
and having too much of a good thing can lead to several plant damage.
Sulfur, nitrogen and potassium leads to leaf burn; calcium, phosphorus
and iron reduces the plant’s ability to absorb other important
nutrients, and copper, boron and zinc increase the chance of leaf drop.
Furthermore, the excess nutrients change the soil’s pH balance and can
build up to toxic levels over time.
Proper Fertilization
The proper way to fertilize your roses depends on what type
of fertilizer you are using
and when you are applying it.
Fertilizer can
be applied before or after you have planted the bush.
Fertilizers added
post-planting should be applied in early morning so the plant can
absorb them quickly and reduce the chance of burning.
Most fertilizers
are added directly to the soil while others are sprayed onto the rose’s
foliage. Apply fertilizer to the soil around the rose’s drip line.
For
foliage sprays, add a surfactant substance --
such as 1/4 teaspoon of
mild dish soap per gallon of mixture -- that helps the fertilizer stick
to the foliage.
Spray the foliage until the liquid drips off the plant.
Water the rose well the day before and the day after applying
fertilizer.
This ensures the nutrients in the fertilizer move to the
root zone quickly.
Since each type and brand of rose fertilizer has its
own specific directions,
follow the feeding instructions on the
fertilizer’s label.
Roses love their fertilizer when it's applied correctly.
Rose bushes remain a perennial favorite due to their undying
beauty, popularity and the many varieties that currently are available.
Whether you choose shrub roses, carpet roses, long-stemmed roses,
old-fashioned roses or climbing roses, fertilizing is necessary to do
what's best for the bush. However, a few common mistakes that are made
when fertilizing roses can cause problems due to over-fertilizing while
neglecting other care.
Soil Tests
The key to understanding what your roses really need is
having a soil test performed in the area
where your roses are located.
Obtain a soil test from a local nursery, extension office or online,
but
only choose those that read the results for you and can give you
educated suggestions on what to purchase. A typical soil test will show
you the pH of your soil, along with the nitrogen (N), phosphorous (P)
and potassium (K) levels.
Sometimes they will show additional nutrient
levels as well.
Over-fertilizing often is the result of pure assumption
that your roses "need something" rather than cold, hard facts about what
they are lacking.
Organic Vs. Chemical
Excellent rose fertilizers exist on the organic and inorganic
sides of the spectrum,
and it will be your personal preference on which
you'd like to use.
Organic fertilizers are natural, meaning they come
from a natural, living source. Common organic fertilizers used on roses
include blood meal, bone meal, cottonseed meal, fish emulsion or fish
meal.
The inorganic, or chemical, fertilizers are man-made from various
chemicals,
and still provide the necessary N-P-K values and other
micro-nutrients roses need.
New Roses
Before planting, mix in high-quality organic soil amendments,
such as compost,
composted manures, peat or others.
As these break
down, they'll also increase the drainage abilities of your soil
while
slowly feeding your plant. Once your young, tender rose bush produces
its first blooms, you then can add chemical or stronger fertilizers.
Established Roses
The best time to start your annual feeding regimen is
directly after pruning in late winter or early spring. This gives you a
starting time to help you stay on top of the care of your roses.
Right
after pruning, add organic amendments back into the soil.
The American
Rose Society recommends the following recipe
for your first spring
feeding:
1 cup bone meal,
1 cup cottonseed meal,
1/2 cup blood meal,
1/2
cup fish meal
and 1/2 cup epsom salts per bush.
To add this mixture to
the soil, water first, spread the mix thoroughly around the drip line,
scratch it in and then water thoroughly again.
After about three weeks,
you can start to add your standard fertilizers every two weeks or so.
Healthy, blooming roses (Rosa spp.) add a splash of bright
color during their flowering period, but blooms quickly lose beauty as
they begin to fade. Most roses thrive in U.S. Department of Agriculture
plant hardiness zones 4 through 11, depending on variety
. Deadheading,
the removal of spent flowers, can improve
the appearance and health of
the rose bush.
When it's done correctly, the rose may even flower more
prolifically and reward you with many more blooms.
Benefit
Fading roses attempt to set seed, which depletes plant
energy.
Success signals the rose that further flowering isn't necessary. For many rose varieties, removing spent blooms can cause production of
more buds,
lengthening the bloom period.
The wilted roses detract from
the appearance of the rose bush,
so deadheading also improves the
ornamental qualities of your garden roses. Dead plant material can
attract pests or provide a breeding ground for fungal spores.
Prompt
flower removal may improve the health of your roses.
Rose Varieties
Not all rose varieties require deadheading. Some varieties of
old garden roses, such as Rosa rugosa, bloom once per season. This
variety produces a fruit, rose hips, which can provide interest and bird
food during the dormant winter period.
The hips may also be used to
flavor jams and other food items.
There's no need to deadhead if you
want to produce rose hips.
Rose varieties that can bloom multiple times
during the summer, such as hybrid tea roses, benefit most from prompt
deadheading.
Method
Deadheading is a form of pruning.
It's vital to make the cut
correctly, so the bush retains an attractive form. After the first flush
of bloom, remove spent flowers by cutting just above a set of three or
five leaves on the stem beneath the spent bloom. For subsequent
deadheading, cut mainly above a five-leaf grouping. You can also
deadhead back to a seven-leaf set,
although this may result in the
removal of a long cane.
Make the cut at a 45-degree angle within 1/4
inch of the chosen leaf grouping.
Bypass shears with sharp cutting edges
will cut through the rose stem without crushing it.
Sealing
Pests such as the rose borer (Agrilus cuprescens) can enter
the cane through deadheading cuts. These pests bore into the cane and
cause stem or plant death.
Borers only breach stems wider than a pencil,
or about 1/4-inch in diameter or larger.
Sealing the cut after
deadheading prevents pest intrusion, and helps keep the rose plant
healthy.
Rose sealant is available, but you can also coat the cut
with a
thin layer of clear nail polish
or wood glue to keep the borer out.
If
you use sealant, paint it on thinly, following all package instructions
for proper use and safety.
Deadhead rose plants regularly to maintain a stunning display.
The proper method for deadheading rose plants varies according
to the type of rose,
although the reasons for deadheading are universal.
Rose gardeners should deadhead throughout the blooming season to
prevent the plants from forming hips, the fruits where seeds develop.
Removing the old dead flowers allows the plant to direct its energies
and resources
to growing new canes and producing more blooms.
It also
keeps your roses looking tidy and at their regal finest.
It is safe to
deadhead rose plants until October 1, when they begin to harden off for
the winter.
1
Deadhead
newly planted rose bushes of all varieties without cutting back cane
length
during their first year after planting.
Snip the spent bloom off
just below the base of the flower with clean, sharp shears.
This allows
the young plant to keep as much cane tissue and foliage as possible
while it is developing.
Canes form the basic framework and foliage makes
food for the plant, resulting in a healthier,
more robust rose bush
with larger and better flowers.
2
Cut
spent blooms of all mature rose plant varieties just below the base of
the flower following the first spring flush of the year.
This leaves as
much wood and foliage as possible, which promotes healthier canes a
nd
sturdier main stems in mature rose plants.
3
Prune
the stems of spent floribundas and hybrid tea roses back to ¼ inch
above the first or second leaf with five outward-facing leaflets
throughout the remainder of the blooming season.
Slant the shears at a
45-degree angle pointing away from the plant.
The further down the stem
that you deadhead, the thicker the wood grows. Deadhead down to the
first leaf if you want the stem to bloom faster but produce more
numerous flowers, which will be smaller.
Make your cut lower if you do
not mind waiting longer for fewer but bigger blooms.
4
Deadhead
mature shrub and climbing rose plants back to ¼ inch above the first
five- or seven-leaflet leaf with an outward-facing bud throughout the
remainder of the blooming season.
Make a clean, outward-slanting,
45-degree-angle cut.
5
Apply
a dab of white glue to large, woody cut canes if you wish.
This will
seal the wound and prevent insects from boring into it and fend off
fungal and disease organisms. Small stems seal themselves.
More rosebuds means more abundant flowering on the plant.
A flowering rose bush (Rosa spp.) adds color and texture to
your garden,
but only if it sets plenty of healthy buds.
Roses flower at
different times depending on the variety,
but many can bloom all summer
with proper care. Most roses grow in U.S. Department of Agriculture
plant hardiness zones 5 through 9. A rose bush may fail to set flower
buds for various reasons, but you can fix most of them if you can
identify the cause.
Bloom Period
The flowering period and time of bud formation depends on the
rose variety. Most roses begin producing leaf buds on old wood in late
winter or spring, although the old-fashioned, spring-blooming varieties
form their buds on new wood during the winter.
Flower buds are also only
formed during specific seasons.
The modern rose varieties, which
include hybrid tea roses, floribunda roses and grandiflora varieties,
should produce flower buds from late spring through fall. Old roses,
which include European and Chinese roses, produce flower buds in spring
and sometimes early summer, but they won't have buds for the rest of the
year.
Pruning Problems
Pruning at the wrong time can prevent flowering
if you've
removed all the bud-producing wood from the plant.
Modern roses need
pruning in late winter during the plant's dormancy,
after the leaf buds
becomes visible but before they begin to actively grow.
Old rose types
require pruning after they bloom.
Trimming earlier removes the
flower-producing plant canes
and you end up with few or no buds.
You can
encourage more budding on modern roses by making pruning cuts within
one-fourth inch of an outward-facing bud near a three- or five-leaf set
when you cut flowers or trim out damaged wood throughout the flowering
season.
Water Stress
Too little water stresses a rose bush.
The plant responds by
decreasing bud formation and flowering.
The leaves may wilt, dry or drop
from the plant.
Watering the roses deeply once a week when they are
actively growing encourages healthy flowering.
Provide 2 to 3 inches of
water weekly,
or enough to moisten the soil to a 12 to 18 inch depth.
Avoid soggy soil but don't allow the site to dry out completely.
Nutrient Deficiency
Nutrient deficiencies can result in small flowers, fewer buds
and overall poor growth on the rose bush. Apply a granular fertilizer
formulated for roses, using the amount recommended on the package.
Roses
generally need fertilizing in spring after the leaves grow in, then
after each blooming flush for the remainder of summer.
Stop feeding the
plants about six weeks before frost,
otherwise they produce tender new
growth that suffers winter damage.
Apply fertilizers six inches away
from the plant's base, and water thoroughly after application so the
nutrients soak into the soil.
Site Problems
Too little sun or too much wind exposure can also affect
budding.
Wind damage, especially dry, hot winds, suck moisture from the
plants and cause water stress,
even if you water regularly.
Roses
require about six hours of direct sun a day.
An overly shaded area
prevents the plant from producing its optimum amount of foliage and
flower buds.
Over-fertilizing a lawn makes the grass grow too quickly.
Fertilizing plants encourages healthy growth and flowering, but
too much leads to problems.
The three main ingredients in fertilizers
are nitrogen, phosphorus and potassium.
Nitrogen encourages foliage
growth, phosphorus encourages root growth and flowering, and potassium
helps plants absorb other nutrients, among other things.
Sometimes
imbalances cause plants to grow spindly without flowering, but other
times plants receive too much of all nutrients.
In these cases, you'll
need to recognize the symptoms of over-fertilizing and change your
feeding routine to keep your plants healthy and attractive.
Symptoms
Some signs of over-fertilizing are easy to spot.
The most
obvious is fertilizer crusting on the surface of the soil. Other
symptoms include the tips of leaves turning brown and lower leaves
yellowing, wilting and falling from the plant.
When fertilizer scorches
roots, the roots may blacken and go limp. And though fertilizer should
encourage healthy growth, too much can stunt growth or stop it entirely.
These symptoms occur when salt builds up in the soil,
making it
increasingly difficult for the plant to absorb water.
Types of Over-Fertilizing
Besides adding too much fertilizer at once, it's possible to
over-fertilize in less apparent ways, too. Sometimes fertilizer builds
up when soil doesn't drain well.
Other times, the fertilizer isn't
flushed through the soil with water, causing root burn.
Slow-release
fertilizers may help regulate the release of nutrients into the soil
over time, but it's still possible to add too much if you don't see
results as soon as you expect them.
All of these activities can cause
plants to show signs of over-fertilizing.
Fertilizing Houseplants
You may notice more symptoms of over-fertilizing in
houseplants than in outdoor plants,
because plants that receive less
light need less fertilizer.
Even following the fertilizer package's
instructions on houseplants can result in over-fertilizing, given the
lower light levels indoors.
Plants that receive less than 200 foot
candles of light may not need fertilizer at all,
according to
horticulturalist Erv Evans writing for North Carolina State University
Cooperative Extension.
Other plants, such as orchids, need diluted
fertilizer instead of full strength.
Troubleshooting
If you notice a layer of fertilizer built up on the soil's
surface,
you should remove it without placing more soil on top.
The soil
should be wet when you apply fertilizer,
and flushing water through the
soil after fertilizing can help spread the nutrients
and prevent root
burn.
With houseplants, a leaching every 4 to 6 months helps prevent
salt buildup;
this involves pouring 1 or 2 pots of water through the
plant's container,
letting it drain for 30 minutes and repeating.
When
the growing season ends for winter, stop fertilizing or reduce the
frequency of fertilizer applications, depending on the plant.
Hungry plants need food. Fertilizer plays a special role in
providing your plants with the nitrogen, phosphorous and other nutrients
necessary to support optimal growth, health and disease resistance. But
like most things in life, too much of a good thing creates a bad thing. If you use too much fertilizer on your perennial plants and flowers,
you could kill them.
If you notice signs of over-fertilization in your
garden, immediately water your plants to thoroughly flush the excess
nutrients away from their roots.
Healthy Foliage But No Flowers
You prize some of your perennials for their vibrant blossoms
that add a spark of color to your yard. And while appropriate amounts of
fertilizer helps encourage healthy blossom growth, too much fertilizer
can create excess nitrogen levels that stop the plants from producing
flowers.
If the plant has otherwise healthy, lush foliage but no
blossoms during its traditional flowering time, you have likely
over-fertilized it.
Plant "Burns" and Leaf Drops
Fertilizer products are actually various types of salts.
When
applied too heavily or during a time of drought, the salt in fertilizer
sucks moisture out of a plant's roots and plant tissue, resulting in
"burned" tissue that's so dehydrated it dies. Symptoms include dead
tissue around the base of the plant where the plant may have come in
contact with fertilizer.
In cases where the roots have been burned, all
of the plant's leaves may completely fall off
because the roots are no
longer able to supply the perennial with water and nutrients.
Leaf Edges Turning Brown
Chronic situations of constant, moderate over-fertilization
reduces the plant's ability
to absorb nutrients because its roots are
constantly being injured by the excess fertilizer.
In such cases, the
plant's leaves may become pale or the edges of the plant's leaves may
start to turn brown. These symptoms generally appear within a week of
fertilization.
Special Considerations for Potted Plants
In a container garden, other symptoms of over-fertilization
may appear among perennial plants
that are specific to the growing
system.
Besides the general symptoms, such as leaf edges dying or all of
the leaves falling off,
another sign is a hard mineral crust forming on
the surface
of the potting soil,
accompanied by white stains around the
pot's drainage holes.
This is created by the excess salts in
fertilizer.
To resolve this, break off and remove the hardened salt
crust
on the surface of the potting soil and water the pot.
It's
critical to note that pots are more prone to over-fertilization,
because
nutrients build up over time within the small, contained space of the
pot.
Leach potted plants every six months by watering the pot with water
that's twice the volume of the total pot's volume.
For example, if
using a 1 gallon plant pot, water the pot with 2 gallons of water.
Regular leaching flushes the soil and keeps fertilizer from
accumulating.
Plants vary when it comes to their foliage, blooming, growth and
needs. However, almost all vegetation can benefit from the proper type
of fertilizing. Fertilizers, also differ in their nutrient component and
percentage. The right type and method of fertilizing can enhance the
color, amount and size of the blossoms on your flowering plants. It is
essential to learn how to fertilize flowers to have successful results.
Steps
1
Choose a fertilizer suitable for flowering plants.
The best fertilizers for flowers contain nitrogen (promotes growth),
phosphorus (enhance roots system and strength) and potassium (improves
flowering).
Look for a fertilizer with a balanced amount of nitrogen, phosphorus
and potassium. Many flower gardeners use a 10-10-17 mixture for the
greatest results.
Select the form of fertilizer you wish to use.
Fertilizers are found in 3 main forms: granular, water soluble and natural organic.
Granular fertilizers are applied by sprinkling or with a spreader.
They are longer lasting and can remain in your soil for up to 9 months.
Water soluble fertilizers are a type of powder that dissolves in
water to be applied as a liquid. This type remains in the soil for a
couple of weeks. However, it is absorbed through the leaves and often
works faster.
Natural organic fertilizers are created from natural matters such as
manure. They often have fewer nutrients compared to man-made
fertilizers.
Begin to apply the fertilizer at appropriate times for your type of flowering plants.
The soil for annuals and new planting of other flowers needs to be fertilized during bed preparation.
Established perennials and ornamental grasses need fertilizing as soon as their growth resumes in the spring.
Bulbs need fertilizing as soon as growth appears.
Roses need fertilizing beginning in May but not after July. You do not want to encourage new growth as fall and winter approach.
Read the package of fertilizer to determine how much is needed.
Some packages give applications based on area to be fertilized. You may have to calculate the area of your flower bed.
Fertilize the flowering plants again according to the recommendation on the fertilizer packaging.
Granular fertilizers will require fewer applications.
Tips
Test, or have some tests performed on, your soil if you are
uncertain of its quality. You may find your soil is lacking a specific
nutrient. You can then look for a fertilizer with a higher percentage of
that ingredient than normal.
Move the mulch back when applying fertilizer to the base of the
plants and to the ground. This will expose the soil and ensure that your
fertilizer does not only get soaked into the mulch and not reach the
soil.
WARNING:
Do not use a fertilizer with a higher percentage of nitrogen than
potassium. You want your flowers to focus on blooming rather than
vegetation. A higher nitrogen level is better used for growing
vegetables.
Fertilizing to Create more Blossoms on Your Flowers, Flowering Shrubs, and Trees
The
secret to making your flowering trees, shrubs, annuals, and perennials
bloom more
is in the numbers. All fertilizers have analysis numbers on
the package.
These numbers represent the percentage of each chemical the
product contains.
For example, 12-12-12 is a typical garden garden
fertilizer
that would contain 12% nitrogen, 12%phosphorous, and 12%
potassium.
The quick explanation is; nitrogen produces vegetative, or
top growth,
phosphorous produces flower buds, fruit, and root
development,
while potassium builds strong healthy plants.
Most lawn grasses are vigorous growers and therefore
require significantly more nitrogen
than the other plants in your yard. A
lawn fertilizer would have an analysis of 26-3-3,
indicating a
fertilizer high in nitrogen. You would not want to use a fertilizer
containing such a high percentage of nitrogen on landscape plants
because it would be very easy to burn them.
You must also keep in mind
that many lawn fertilizers contain broad leaf weed killers,
and most
ornamental plants have broad leaves.
The fertilizer doesn’t know the
difference, and it will damage or kill ornamental trees and shrubs.
During the summer months the growth rate of most plants
slows down,
and when plants are not actively growing, they need very
little nitrogen.
Although not vigorously putting on new growth, many
plants such as Dogwood Trees, Rhododendrons, and Azaleas are quietly
working to produce flower buds for next year. Annual and perennial
flowers are also busy making new flower buds.
To encourage flower bud production you can apply a
fertilizer that contains a small percentage
of nitrogen, a higher
percentage of phosphorous, and a little potassium.
I recently purchased a
liquid fertilizer with an analysis of 5-30- 5, ideal for flower
production.
Because the product is sold as a bloom producer, the
manufacture also added a little chelated iron, manganese, and zinc, all
good for your plants as well.
Most garden centers and discount stores carry similar
products. I chose a liquid fertilizer because liquid fertilizers are
absorbed both through the roots and systemically through the foliage, so
they work quicker.
I used a sprayer that attaches to the end of the
garden hose to apply the fertilizer, but do not use the same hose end
sprayer that you use for lawn fertilizers.
There could be residual weed
killer still in the sprayer.
About those hose end sprayers. I purchased one that is
supposed to automatically mix the proper ratio for you. I used it to
apply a general insecticide, and it worked,
but it sure seemed like I
went through a lot more insecticide than I needed.
When I used it for
the fertilizer the screen on the little pick up hose inside the jar kept
getting clogged with the tiny solids in the fertilizer.
I recommend
using a solution of one part liquid fertilizer
to one part water in the
sprayer jar, and applying at a heavier rate.
Watch the liquid in the sprayer jar, and if it isn’t
going down ,
remove the lid and clean the little screen by spraying it
with water from the garden hose.
Read the application instructions on
the container to determine how much fertilizer to apply,
and how often.
A
fertilizer high in phosphorous will increase flower production.
You
will see a difference.
Remember the golden rule of applying fertilizers. “Not enough, is always better than too much.” SOURCE: http://freeplants.com/free-article-fertilizing-to-create-more-blooms.htm +++++++++++++++++++++++++++++++++++++++++++++++++++++++++++++
Which Fertilizer Element Encourages Flowering Growth in Plants?
by Jasey Kelly, Demand Media
Phosphorus fertilizers often help most at transplant time.
Flower growth on a plant is an essential part of the plant's
reproduction.
The healthy growth of plants requires all fertilizer
elements;
a lack of one can result in many symptoms.
While all elements
play a role in plant development and, subsequently, flower development, phosphorus is the element most responsible for stimulating stronger bud,
fruit and flower development.
Primary Nutrients
Plants require 16 nutrients for growth.
Three of these are
taken from air and water: carbon, hydrogen and oxygen.
Of the remaining
essential nutrients, three are considered primary nutrients: nitrogen,
phosphorus and potassium.
These three are taken up in larger amounts by
plants, are the most commonly deficient in soil
and are the three most
commonly applied.
The three-digit number on a package of fertilizer is
known as the N-P-K rating
and lists the percentage ratio of nitrogen,
phosphorus and potassium, respectively.
Phosphorus' Role
Fertilizers specifically formulated for bud and bloom
development are often higher in phosphorus
than the other two primary
nutrients.
This is because phosphorus is a vital nutrient involved in
stimulating and enhancing bud development and set, seed formation and
blooming.
It can help quicken a plant's maturity, as well.
It's also
vital in photosynthesis and respiration.
Root-stimulating fertilizers
are also often higher in phosphorus than the other two primary nutrients
because phosphorus helps strengthen young roots and gives them a strong
start.
Roles of Nitrogen and Potassium
While phosphorus is the element most associated with flower
growth and production,
nitrogen and potassium, along with the secondary
nutrients and micronutrients, are all vital.
Nitrogen is a major element
in amino acids, often called the "building blocks of life." Nitrogen
stimulates stronger green growth,
which provides healthy stems and
leaves while promoting fruit and seed production;
nitrogen also helps
stimulate growth in roots and is necessary for the uptake of other
nutrients.
Potassium, on the other hand, is vital to several areas of
plant growth, including drought tolerance, disease resistance, stem
strength, improved texture, color and flavor of fruits, and
photosynthesis.
Bottom Line
A deficiency in one nutrient can cause lackluster performance
by plants,
including stunted flower growth.
But most soil is sufficient
for flower production,
especially when amended with rich, organic
material and all other plant requirements are met.
Using a flower
fertilizer, or one specifically designed for bud and bloom production,
may help in the long run but probably is not necessary.
If you're
unsure, perform a soil test to see if your soil is lacking in any of the
essential nutrients.
Correct fertilization schedules help support large, colorful blooms.
Proper fertilization encourages healthy plant growth.
While
many fertilizers support development of prolific foliage,
Miracle-Gro's
Bloom Booster is formulated specifically for flowering plants.
If you
want to see masses of brightly colored blooms,
you must pick the
perfect time to apply this fertilizer.
Bloom Booster also benefits some
plants that are chosen for features other than their flowers.
Before Blooming
The Bloom Booster formula contains all three macronutrients
for plant growth,
but the mixture has an especially high concentration
of phosphorous.
While high nitrogen content encourages the growth of
foliage, an abundance of phosphorous encourages plants to produce plenty
of strong, healthy flower buds.
Miracle-Gro recommends you start
applying this fertilizer when the plant is first beginning to form buds.
This ensures the plant has plenty of phosphorous available for other
key functions, such as water movement and chlorophyll production.
During Blooming
Both perennials and annuals will stop flowering if phosphorus
levels get too low.
Phosphorus is used in most vital functions of a
plant, so continuing to apply Bloom Booster through the flowering stage
will encourage new buds to continue forming. The manufacturer recommends
applying this fertilizer every seven to 14 days while the plant is in
full bloom.
Flowering house plants can handle a continuous diluted dose
of the fertilizer throughout the year to encourage constant blooming.
For Vegetables
A fertilizer with high phosphorous levels, like Bloom
Booster,
may also help encourage production in vegetable gardens.
Nitrogen-rich mixtures are acceptable for plants grown primarily for
their leaves,
but they can cause fruiting plants to spend more energy on
leaf production than necessary.
Bonnie Plants recommends using a
product with a high phosphorus content
on vegetables and fruit vines
that are creating buds and flowers.
Increasing flower production also
increases your potential for a big yield of watermelons, bell peppers or
tomatoes.
When to Stop
Applying Bloom Booster fertilizer to annuals and perennials
can encourage them to keep blooming long after they would naturally
stop.
The Alameda County Master Gardeners of the University of
California recommends gradually stopping all supplementary fertilization
in October.
gives the plant time to prepare for colder weather.
Indoor plants can continue to receive Bloom Booster,
but most flowering
plants require at least a few months of dormancy each year.
Check the
dormancy recommendations for each specific species to create a blooming
schedule that won't shorten the life of your plants.
Phosphorus aids in strong root development and bloom production.
Phosphorus is a much-needed element for plant development and
growth.
nutrient in the soil helps to satisfy one of the plant's
needs; phosphorus is no different. Phosphorus aids in the development of
strong, healthy roots and as such is often sold at transplanting time.
Some high-phosphorus fertilizers are known as "root-stimulating"
fertilizers for this reason. Phosphorus also aids in the development of
seeds, buds and blooms and therefore is excellent for flowers, fruits
and fruiting vegetables.
Phosphorus is the middle number in the N-P-K
rating,
or three-digit number, on the package of fertilizer.
Organic Phosphorus Sources
Several organic sources of phosphorus are commercially
available. Among these is fish bonemeal or other bonemeal, made from the
crushed bones of various animals.
Bonemeal often has an extremely high
percentage of phosphorus,
from 11 percent to 18 percent, and sometimes
even more.
Various types of guano are also high in phosphorus.
Vermicompost is high in both nitrogen and phosphorus.
Vermicompost is
manure that has been digested by worms.
While this reduces the volume,
it adds microbial diversity, a plus when amending your soil
due to the
increased microbial activity.
Inorganic Sources
Rock phosphate is another source of phosphorus and is mined
within the United States.
Rock phosphate has a high percentage of
phosphorus, typically 8 percent to 20 percent.
Nurseries and big-box
stores also sell root-stimulating fertilizers high in phosphorus, as
well as fertilizers with names like "Bud and Bloom Booster."
Types of Fertilizers
Either liquid and dry fertilizers are can be added to soil to
boost the phosphorus content.
Plants will absorb the phosphorus from
both fertilizer types,
so you can choose the one that suits you best.
Granular fertilizers are composed of small granules that are typically
raked into the soil
around the plant and then watered in.
Liquid
fertilizers are often mixed with water and poured around the drip line
of the plant.
Considerations
Similar to most things, too much of a good thing applies to
phosphorus. Too much phosphorus can greatly damage the plant by making
it difficult for the plant to absorb various other nutrients.
Phosphorus
is also a main suspect in various environmental problems,
especially
those concerning bodies of water. It can promote the growth of dangerous
algae to the point of inflicting illness and even death to animals. Because of this, only add phosphorus when needed.
Having a soil test
performed on your soil to see which nutrients are lacking is one way to
know how much phosphorus to add.
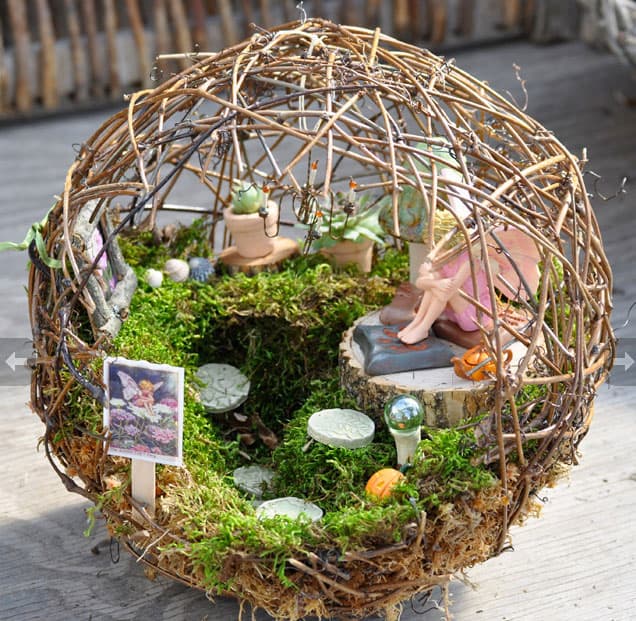
Whether you call them fairies, wee people, elves, or gnomes, it’s
fun to design fairy gardens to attract these enchanted beings to the
landscape. You may not know how your fairy garden will turn out when you
start to design it, but if you’re a gardener, you know that no
respectable fairy would inhabit a land without flowers!
The pink blossoms of Kalanchoe
are easy to maintain in full sun fairy gardens (morning sun is best).
Although the blossoms look delicate, the foliage is succulent, so the
plants can go longer without a drink. If you aren’t tickled pink by this
fairy garden, then you can shop for Kalanchoe plants that produce orange, purple, red, or yellow flowers.
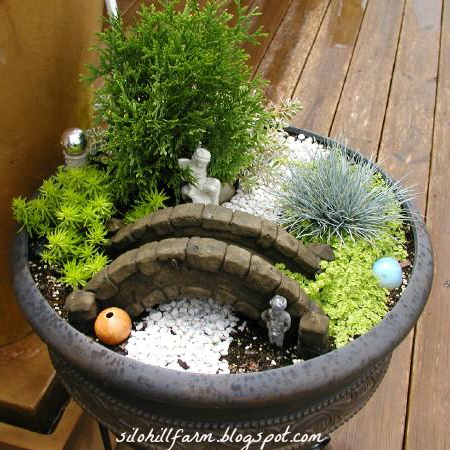
Any true flowering vine would quickly overcome such a dainty
arch, so how can a fairy gardener appoint her garden structures? For
arches and gazebos, plant a trailing plant like million bells or sweet alyssum
(on the left in this photo) at the base of the structure. Train the
plant over the structure, attaching it with some twine or wire. You will
need to trim this modified topiary frequently to keep it in check.
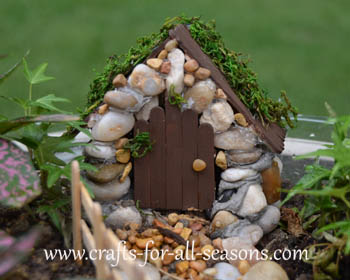
If you aren’t sure where or whether to devote a special space in
your flower garden to fairies, then don’t! You can set up a temporary
fairy garden in five minutes by placing the contents of a fairy garden
kit in a part of your garden that has low-growing, blooming plants. If
you don’t find a complete kit, then buy or make the two essential
accessories: a fairy, and a fairy dwelling.
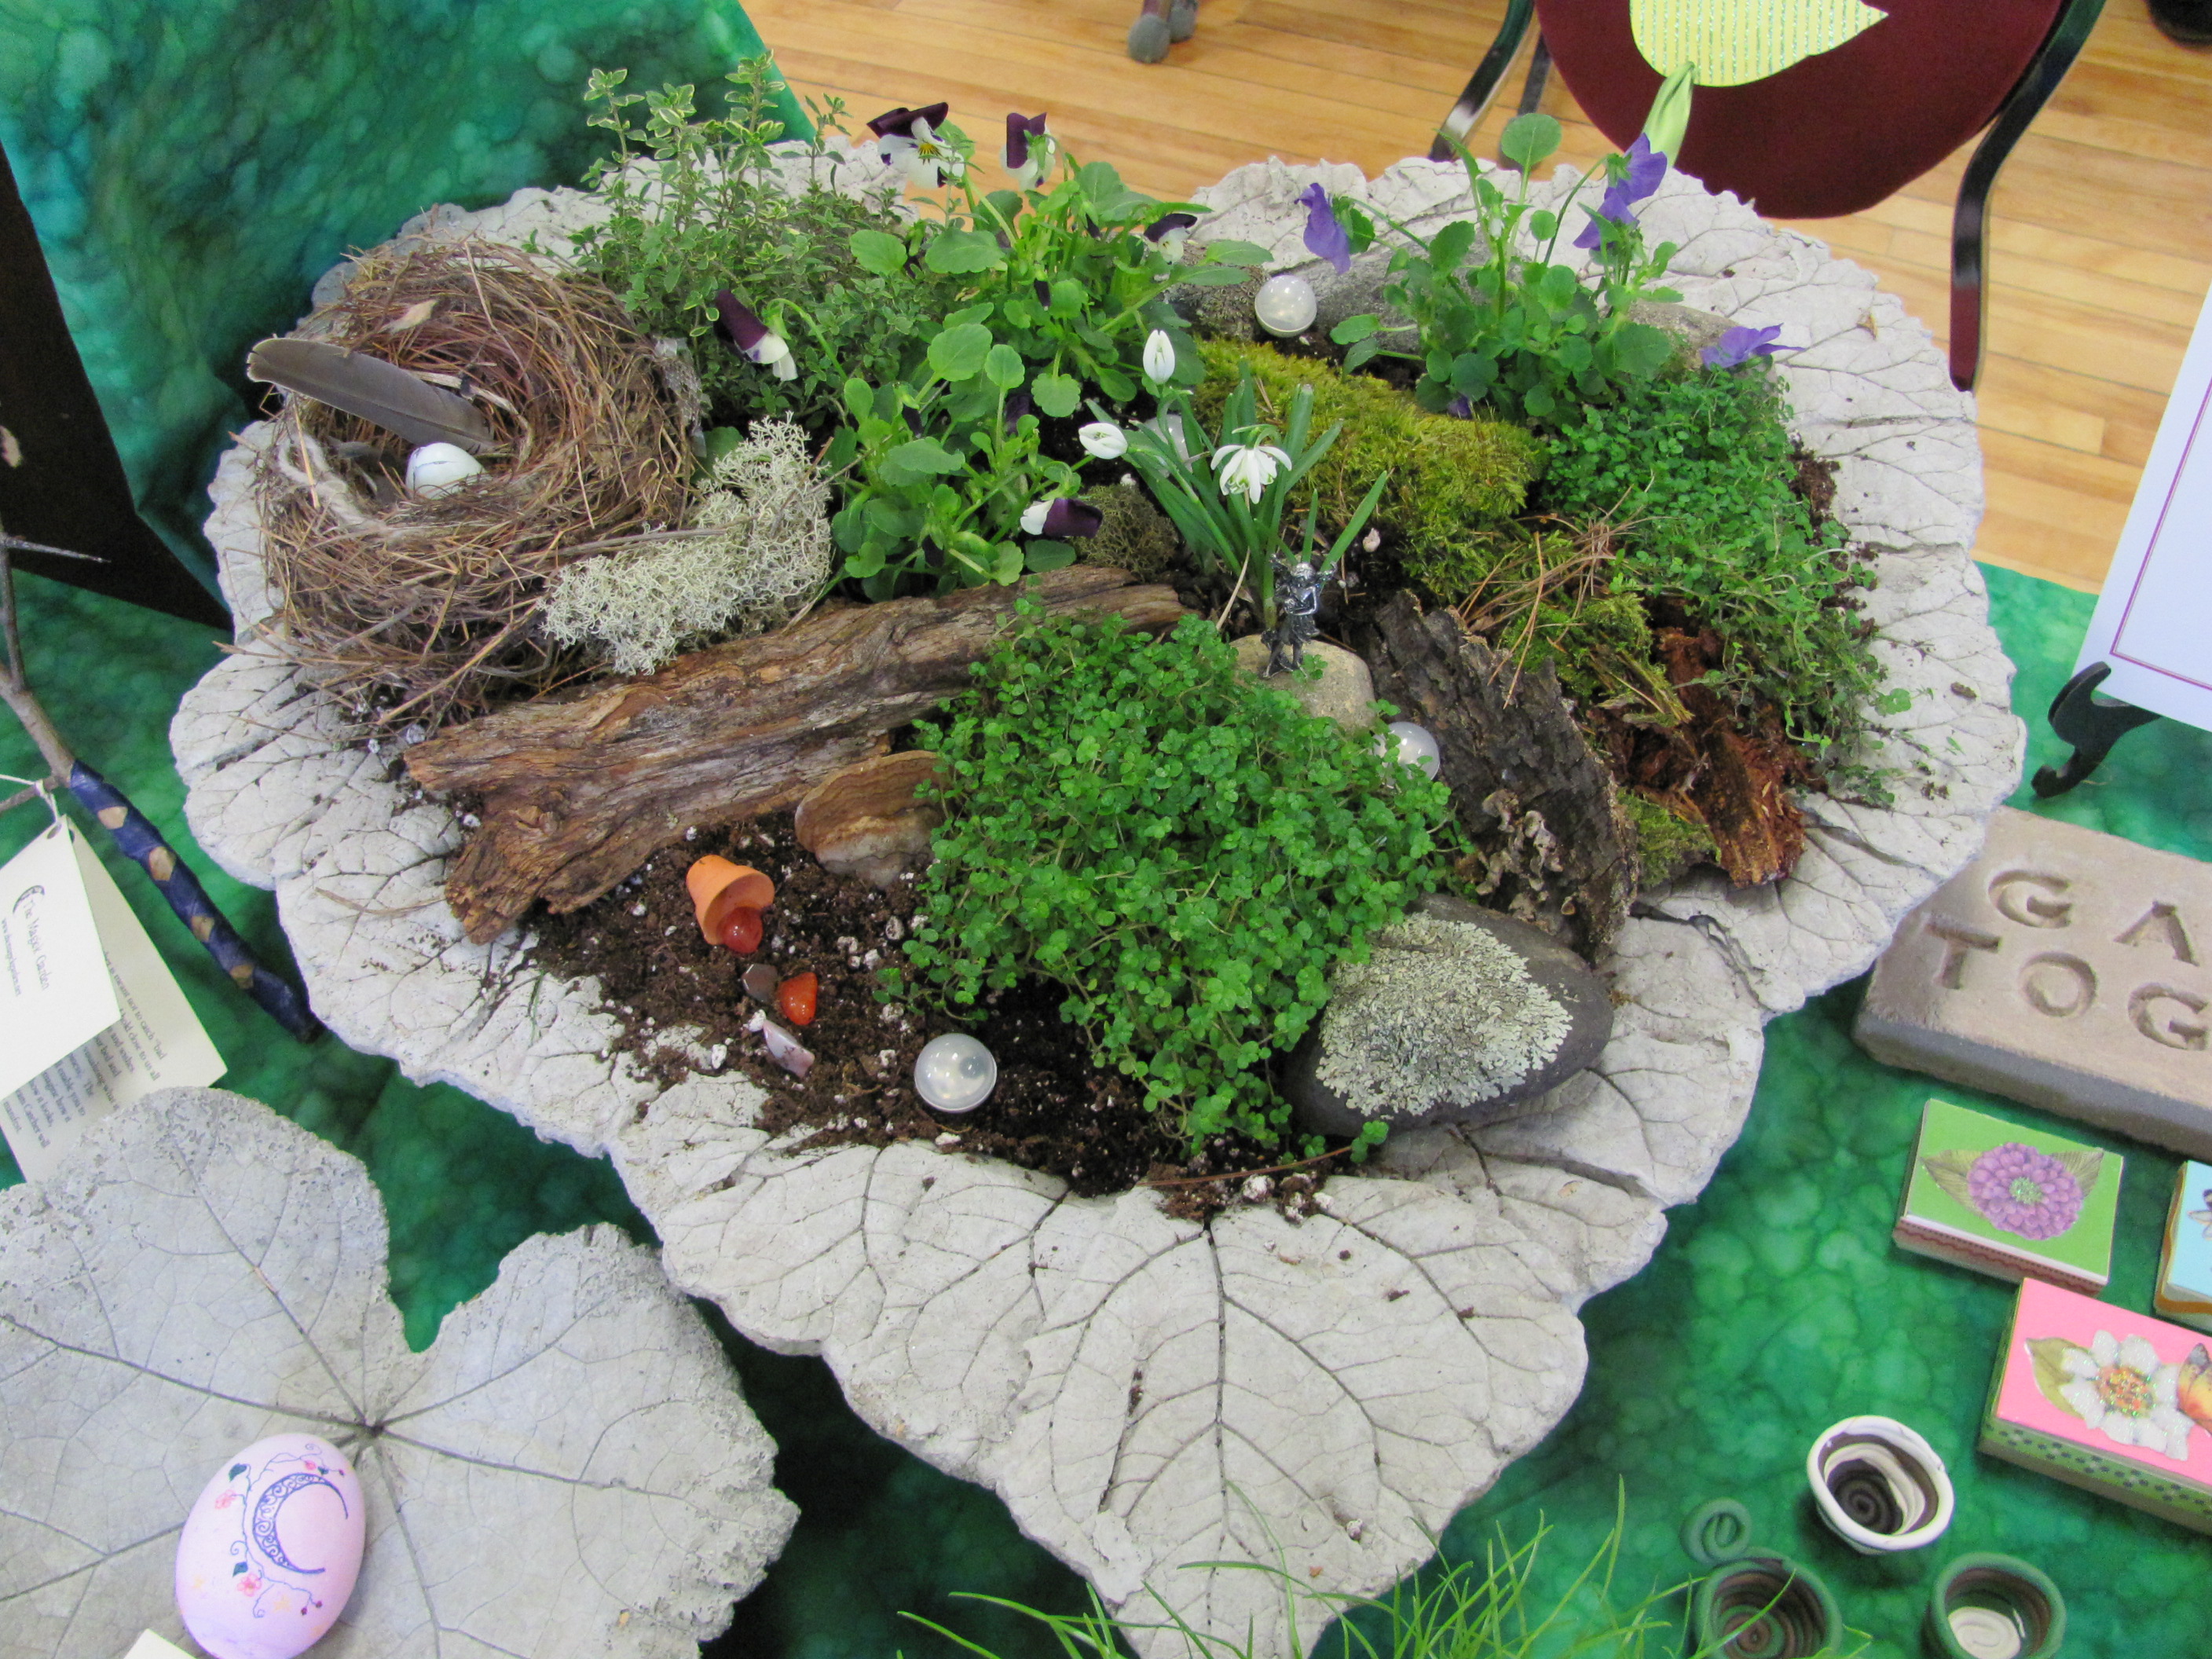
If you’re using a small container for your fairy garden, you
must choose your flowers carefully to avoid plants that will overstep
their bounds. This is a case where you want to pick plants that not only
produce small flowers, but also have a dwarf growth habit. Examples
include Irish moss, which produces white flowers, and Mount Atlas daisy, with fern-like foliage and tiny daisy blooms.
Playing with scale is one of the fun elements of fairy garden
creation. Diminutive objects seem enormous through a fairy’s eyes, so
you can create a forest with a few 12-inch tall specimens. Consider
using flowering topiaries to make these fairy “trees.” Lavender and fuchsia plants are easy to train into a standard.
Fairies must find a fairy garden to populate it, and they won’t
find a miniature garden amongst towering clumps of perennials. If your
taste in garden flowers isn’t fairy-friendly, you can still have a fairy
garden by elevating the accessories. Use a stump, a wheelbarrow, or an
antique chair to give your fairy garden a boost.
If your fairy garden is indoors, choose flowering houseplants
that can take the low light conditions. Miniature African violets won’t
grow larger than six inches in diameter, and will bloom constantly
given the right light, moisture, and fertilizer. Like standard African
violets, miniature plants appreciate bright indirect light or
fluorescent light. Allow soil to dry out between watering, and never
permit your plants to suffer from wet feet.